DIY WATERPROOF SHADE SAILS
Waterproof Fabric Shade SailsDIY WATERPROOF SHADE SAILS - FACTORY DIRECT
Discover the Benefits of DIY Waterproof Shade Sails
Waterproof Shade Sails are manufactured with a high quality, robust knitted Shade Sail fabric with a laminated durable waterproof coating. The coating is heat stentored allowing the Shade Sail to be stretched tight without losing its integrity. DIY Waterproof Shade Sails are perimeter wired with 3mm, 4mm or 5mm 316 Stainless Steel Cable, which allows you to fully tension the Shade Sail Fabric drum tight. All fittings and fixings are 316 Stainless Steel, all corners are triple reinforced to withstand severe weather conditions. NB: DIY Waterproof Shade Sails require substantial fall to allow water run off. This will prevent water pooling on your Shade Sail.

Waterproof Garden Shade Sails
2 Waterproof Shade Sails, 1 Shadecloth Shade Sail over outdoor Garden Deck

Middle Point Waterproof Shade Sail
Heat Stentored Laminate Coating on Waterproof Shade Sail Fabric. Note – Concealed, splayed nylon webbing strap with triple the thread of our competitors.
DIY WATERPROOF SHADE SAILS - Installation Instructions
©DIY Shade Sails Australia
Your new DIY Shade Sail comes with everything you need to properly install it. Included are – All Stainless Steel Fittings (Turnbuckles, D Shackles, SST Perimeter Cable and Cable Grip or Grips) plus 4 metres of Starter Cord to pull the Shade Sail onto the fixing points.
- Laminated side, seams and hems face down.
- Attach Direct Fix (D Shackle) Points first, if any.
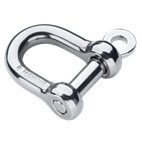
Stainless Steel D Shackle
- Fully open and lubricate then hang Turnbuckles off posts/fixing points. Ensure Turnbuckle has right hand turning end on the post/fixing point, not the Shade Sail. Left hand end on the Shade Sail.
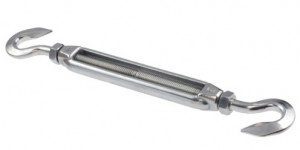
Stainless Steel Turnbuckle
- Lubricate the corner fitting (D Ring) cable groove. This stops the cable from sticking as you tighten the Shade Sail. A spray can of lubricant with a nozzle is the simple way to do this.
- Attach starter cord to the next corner then loop over post/fixing point, back to Shade Sail 2 or 3 times to achieve leverage.
- Pull Shade Sail close enough to attach Turnbuckle.
- Attach all remaining points of the Shade Sail using this method.
- Tighten each turnbuckle 15 turns.
- After you have tightened each turnbuckle 15 times, you can now pull the cable and cable grip (or grips) tight against the D ring. Face cable grip out to allow access for closing the nuts on the cable grip. If there are 2 cable grips (see illustration), put them on opposing sides of the D ring.
- Then close the nuts working from side to side. (Turn each nut a few turns at a time to ensure they are closed equally.) Make sure the cable grip is tightly closed. This is most important to stop the cable moving. (Do not over tighten)
- Go back to the turnbuckles and keep closing them until you have a sufficient amount of tension on the Shade Sail. Look to see the Fabric pulled tight and the cable pulled tight. If your fixing points are strong, you can put plenty of tension on the Shade Sail. Use your judgement. The tighter the Shade Sail, the better it will handle the storms.
It is best to fit your DIY Waterproof Shade Sail on a sunny day. The sunlight will warm the Shade Sail Fabric and increase its flexibility.

Waterproof Blue DIY Shade Sail
Fabric Side faces up, laminate faces down to protect the waterproof laminate coating

Corner Cable Grips
When tightened fully, Shade Sail cable grips hold the cable firm to keep the Shade Sail well tensioned

Shade Sail Cable Grip
Both ends of the Shade Sail Cable are held tightly in place by Stainless Steel Cable Grip.
TIGHTENING THE TURNBUCKLE